ponedjeljak, 22. srpnja 2013.

Root and Install CWM Recovery on Samsung Galaxy S3 Mini GT-I8190, GT-I8190N & GT-8190L

samsung-galaxy-s-iii-mini-rooted
The Galaxy S3 Mini was released as a stripped out version of Galaxy S3 to take advantage of the popularity of the latter. Compared to S3, it is available at a much lower price but spec-wise it is a little monster. The device sports a  4.0-inch WVGA (480×800) capacitive touchscreen display, 1 GHz dual-core processor,  5 MP Auto Focus rear camera, 1GB RAM, and a 1,500 mAh battery. When the Galaxy S3 was released, it had Android 4.1.1 Jelly Bean which was later bumped to 4.1.2.
With due course of time, the device has gained much popularity but unfortunately it could not receive due attention of our developers. As a result, there was a lack of a valid rooting procedure for this handset. Things, however, seem to be changing now as recently mskip from XDA developers has released his root tool kit for the Samsung Galaxy S3 Mini. Mskip’s tool kit is already available for a number of Galaxy devices and it is really a good new for the owners of S3 Mini who wish to root their phone.
The Samsung GS3 Mini ToolKit is an  easy way to do a lot of things on your device. The best part is that it can root all three variants of the Galaxy S3 Mini namely GT-I8190 (internation GSM), GT-I8190N (international GSM model with NFC) and GT-8190L (Latin/USA GSM model). Here are some of the tasks that the tool kit can perform:
  • Install drivers automatically
  • Backup/Restore a single package or all apps and user data
  • Backup your /data/media to your PC for a full safe backup of data
  • Perform a full NANDROID Backup of your system.
  • Install BusyBox binary on phone
  • Root with Superuser (ChainsDD) or SuperSU (Chainfire) via CWM
  • Install any zip file via Sideload feature in Recovery
  • Flash CWM Touch Recovery or TWRP Recovery
  • Help, Information Screen for various tasks
Samsung GS3 Mini ToolKit
Mskip’s ToolKit offers even more!

How to Use Samsung GS3 Mini ToolKit

Just download the file from below and install it on your Windows computer. When it is installed, run it as administrator, turn on USB Debugging mode on your phone from Settings> Developer options and connect the device to computer using USB cable. Make sure you phone is booted, that means you do not have to start it in Download Mode. Also make sure you have installed Samsung USB Drivers. If not, download now from HERE.
  1. Run the ToolKit by double clicking the the ‘Samsung GS3 Mini ToolKit’ shortcut. Make sure your phone is booted and plugged in via USB cable.
  2. The toll will ask you if you want to update it. Type  ”no” and press Enter key.
  3. On the next screen you will have to select your phone’s model number and OS software version. Type the number that corresponds to your device. You can check your phone’s model number and Android OS version from Settings> About.  Suppose your phone model is GT-I8190 with Android 4.1.2, type “12″ at the cursor blink spot.
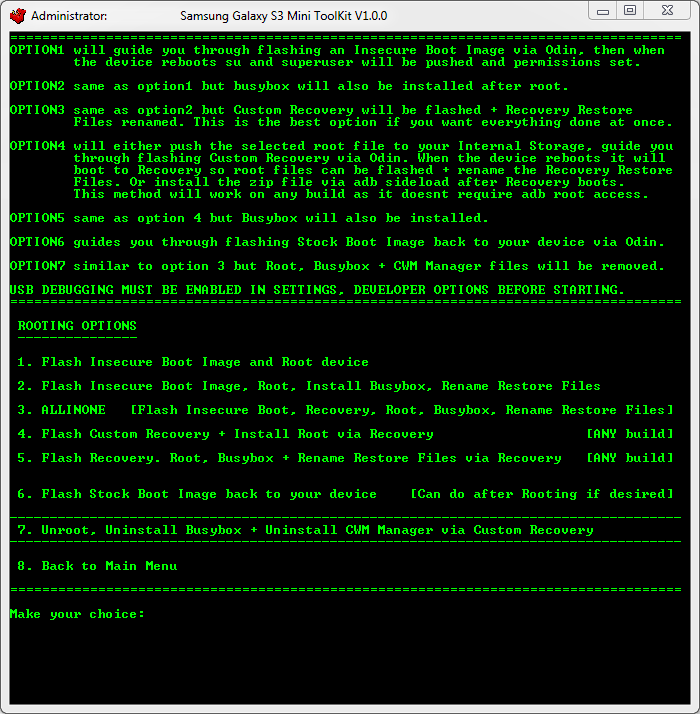
  4. Each option in the ToolKit has GUIDELINES on what it is and how to use it. Just follow the on screen help and type your selection’s corresponding numbers and your phone will be rooted with a custom recovery likeClockworkMod or TWRP installed on it.
GALAXY S3 MINI ROOT TOOL KIT

Download the ToolKit:

How to Root Galaxy Grand Duos I9082 on Android 4.1.2 XXAMCE Jelly Bean Firmware

Samsung recently released its official Android 4.1.2 Jelly Bean update with firmware build number I9082XXAMCE for Galaxy Grand Duos bearing model number GT-I9082. The firmware is now available for download via Samsung KIES as well as Over-The-Air (OTA) in Southeast Asia regions.

Samsung Galaxy Grand Duos I9082 users who have already updated their devices with Android 4.1.2 XXAMCE Jelly Bean firmware, may root their devices using the tutorial below.

Disclaimer: Rooting voids the warranty of your device. We and the developer of this rooting procedures shall not be held responsible if any undesirable outcomes may happen to your device. use of this root guide is solely at your own risk!

Pre-Requisites
1. Install USB Driver for Samsung Galaxy Grand Duos on your computer. 
2. Enable USB Debugging Mode. [Press Menu >> Settings >> Applications. From there navigate and tap on Development option and ensure the USB Debugging is turned on.]
3. Make a backup of all your important data before following the guide.
4. The Galaxy Grand Duos should be factory unlocked and not locked to any particular carrier.
5. Ensure the battery of the phone is charged more than 80 per cent.
6. The Recovery file and the SuperSU files used for rooting are compatible only with the Samsung Galaxy Grand Duos I9082. Applying theses on any incorrect variant will brick the device. Verify the model number of the Galaxy Grand Duos by selecting Settings >> About Phone.

File Required
1. Odin3_v3.07.rar
2. CWM-touch_i9082_chotu.tar.zip
3. Fix-Recovery.zip
4. UPDATE-SuperSU-v1.25.zip

Steps to Install CWM Recovery on Samsung Galaxy Grand Duos I9082
Step 1: Extract Odin3_v3.07.rar and CWM-touch_i9082_chotu.tar.zip files using winrar/7zip/winzip or any other extracting tool.
Step 2: Copy Fix-Recovery.zip and UPDATE-SuperSU-v1.25.zip files to external SD card of phone.
Step 3: Switch off the Galaxy Grand Duos. Then boot the device into Download Mode by pressing and holding Volume Down + Home buttons together and then press the Powerbutton until the device turns on. Now press the Volume Up button to enter Download Mode.
Step 4: Run Odin on your computer.
Step 5: Connect the phone to the computer using the USB cable while the device is in the Download Mode. A message saying Added will arrive under Odin's message box in the bottom left. You will also get to see COM port with a number in Yellow when the phone is connected to the computer successfully.
Step 6: In Odin, click the PDA and select the CWM-touch_i9082_chotu.tar.md5 file. Also, ensure the Auto-Reboot and Re-Partition options in Odin is not selected.
Step 7: Double-check and click Start in Odin. The installation process will now begin.
Step 8: Once installation is completed, switch off the phone manually (Take out the battery). Then unplug the USB cable to disconnect it from computer.

Steps to Root Galaxy Grand Duos I9082 by Installing SuperSU via CWM Recovery
Step 9: Boot the phone into CWM Recovery by pressing and holding Volume Up + Homebuttons together and then press the Power button until the device turns on.
Note: This should boot in CWM Recovery if you manually switch off the phone in Step-8.
Step 10: Now select install zip from sdcard, select choose zip from sdcard and then navigate to the Fix-Recovery.zip file. Select and confirm installation by selecting Yes.
Step 11: Return to main recovery menu and repeat Step 10 but this time choose UPDATE-SuperSU-v1.25.zip file.
Step 12: Once installation process is completed, return to main recovery menu and select reboot system now to reboot phone.

The Samsung Galaxy Grand Duos I9082, running official Android 4.1.2 XXAMCE Jelly Bean, is now rooted successfully.

Root and Install CWM on Galaxy Mega 5.8 GT-I9152, Mega 6.3 GT-I9205 and GT-I9200

Root-Samsung-Galaxy-Mega

Disclaimer:

Though this is just a formality that we bloggers have to do, nevertheless it should be taken seriously. The procedure given below is not for perfect noobs so do not proceed unless you understand what you are really going to do. Rooting voids the warranty of a device but you can later reclaim it by installing the stock firmware back.

Preparations to be Made:

  • Download Odin: Odin3-V3.07.Zip
  • Download CWM Touch Recovery based on your phone model and extract the zip on your desktop:
  • Galaxy Mega 6.3 users can also install the following Rooting package and install using Odin. If you install this, do not uncheck Auto Reboot on Odin while installing: Vcoreroot-V2.Tar
  • Download Chainfire’s SuperUser rooting package and copy it to your phone: UPDATE-SuperSU-V1.34.Zip
  • Download and install Samsung Kies or USB drivers on your computerDownload
  • Enable USB Debugging on your Galaxy Mega. You can do this from Settings> More> Developer Options. If you do not see the option under Settings, see how to enable it: Click Here
  • Charge your phone to have at least 60% battery.

Install CWM Recovery on Galaxy Mega:

Once you have taken care of the above preparatory steps, you can now move on to the real action. First of all, we’ll install ClockworkMod touch recovery on the phone and then root it. Here is how you can do it:
  1. Turn off the phone and boot the device in Download mode: press Volume Down+Home+Power buttons for about 2-3 seconds till you see a warning screen and then press Volume Up.
  2. Now launch the Odin3 3.07 and connect the phone to PC using USB cable.
  3. Wait till the ID:COM port on Odin turns Blue.
  4. Uncheck the “Auto Reboot” option.
  5. Do not mess with anything else on the Odin and click the PDA button and select the Recovery file.Galaxy-Mega-Odin
  6. Finally click the Start button and wait till installation is finished and you see  PASS!! message on Odin.
  7. Now pull out the battery and wait for a minute. Then reinsert it and boot the device into Recovery Mode using the steps given below.

Rooting Galaxy Mega:

Your phones should now have CWM recovery and the next step is to root the device by installing SuperSU through recovery.

  1. Copy the “UPDATE-SuperSU-v1.34.zip” file to your phone.
  2. Turn off your phone and boot it into recovery mode: press Volume Up+Home+Power buttons together for about 5 seconds till you enter recovery menu.
  3. Use the Volume and Power keys to scroll and select options in the recovery mode.
  4. Go to “install zip from sdcard> choose zip from sdcard” option and select the SuperSU zip file.
  5. On the next screen, select “yes” to confirm installation.
  6. Finally, go back to main menu and select “reboot system now”.
When your Galaxy Mega boots up, it should have SuperUser app installed on it. Enjoy!

Alternate Roo Method for Galaxy Mega 6.3 GT-I9205 and GT-I9200:

If you have a Galaxy Mega 6.3 GT-I9205 or GT-I9200 and you encounter any issue with rooting your phone using the procedure described above, here is another method for you. Just make all preparations as mentioned above and do the following things:
  • Download the rootable Kernel with SU and Busybox: Boot.Img.Tar  –  Mirror
  • Put your phone in Download Mode (see above for method).
  • Launch Odin and connect phone to PC.
  • Click on PDA and select the “boot.img.tar” file.
  • Hit the Start button.
  • Wait till the device reboots.
  • Now extract the “UPDATE-SuperSU-v1.34.zip” file and copy the “Superuser.apk” to your phone.
  • Install this Apk as any app.
Thus you phone phone will be rooted.
So, here ends our tutorial on rooting Samsung Galaxy Mega 5.8 GT-I9152 and 6.3 GT-I9205. If you face any problem with rooting your phone, let us know. Since I do not have this phone, I have tested it but it is reported by users to work. Cheers!

How to Root HTC One and Install ClockworkMod Recovery [GUIDE]

The Taiwanese tech major's flagship smartphone, HTC One, featuring a 4.7in full HD display with zero-gap aluminium unibody design, is now available in the UK. HTC One users can now root their handsets and install ClockworkMod (CWM) recovery. 
HTC One is powered by Snapdragon 600 chip featuring a quad-core processor clocked at 1.7GHz.

Pre-requisites
1) Install USB Driver for HTC One on the computer.  
2) Ensure that USB Debugging Mode is enabled on the phone to connect the phone with the computer and use the Android SDK with it. [Press Menu>> Settings>> Applications. From there navigate and click on Development option and ensure the USB Debugging Mode is turned on.]   
3) Create a backup of all data of the phone. If the device is having a custom recovery such as CWM/TWRP installed, then users are recommended to backup the data using the same.
4) The bootloader of the phone should be unlocked. Head over to the officialHTC Dev site and unlock the bootloader of the device by following the on-screen instructions.  
5) Verify that the HTC One should have above 80 per cent of battery charge.
6) The root package and the CWM Recovery file work only on HTC One. Applying these to any incorrect variant might brick the device.  
Steps to root HTC One
1) Download the rooting package for HTC One to the computer [File name: r1-htcone-Superboot.zip]. Then extract the downloaded zip  
2) Power off the HTC One. Then reboot the device into Bootloader mode by pressing and holding Volume Up and Power buttons together for a few seconds
3) When the device is in the Bootloader mode, connect it to the computer using USB cable
4) Extract the r1-htcone-Superboot.zip. Inside the extracted folder there should be a file named as install-superboot-windows.bat
5) Double click this install-superboot-windows.bat file. This will prompt a new window
6) Now follow the on screen instructions to root the phone
Steps to root HTC One on Mac
1) Extract the r1-htcone-Superboot.zip file
2) Turn off the phone and boot into Bootloader mode
3) Connect the phone to the computer using USB cable
4) Open the extracted folder and launch a terminal window from within the folder containing root files
5) Then type the following command
chmod +x superboot-mac.sh then type ./install-superboot-mac.sh    
Steps to root HTC One on Linux
1) Extract the r1-htcone-Superboot.zip file
2) Turn off the phone and boot into Bootloader mode
3) Connect the phone to the computer using USB cable
4) Open the extracted folder and launch a terminal window from within the folder containing root files
5) Type the following command in the terminal window
 chmod +x superboot-linux.sh then type ./install-superboot-linux.sh    
The HTC One should be now rooted successfully. After rooting, those who further wish to install CWM recovery on their devices, may follow our step-by-step guide
Steps to install CWM Recovery on HTC One
1) Download fastboot. zip for HTC One to the computer
2) Download CWM Recovery Touch 6.0.3.1-m7 recovery.img
3) Extract the fastboot. zip file
4) Switch off the phone and boot it into Bootloader mode 
5) Connect the phone to the computer using USB cable
6) Open a command window in the folder where the recovery.img file is placed. Now type the following
fastboot flash recovery recovery.img
7) Doing so will install the CWM recovery image will install on the phone
Note: Users can also flash CWM Recovery on their HTC One using the ROM Manager app from the Play Store.
The HTC One is now rooted successfully with CWM Recovery installed on the device.